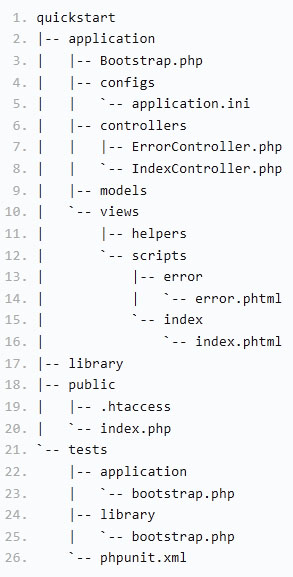
Zend Framework is an object oriented web application framework that uses the MVC (Model-View-Controller) Architecture.  I have been using Zend Framework  for the past one year to build php based web applications. Out of this period i found many freshers who wanted to start with Zend Framework, struck at the first point of creating  tree structured directories for Zend Framework project and their configuration files. Although the Zend Documentation provides step by step instruction for creating your own basic project, it failed to give a detailed instruction for Windows Users to create a directory structure automatically using the CLI Tool for Windows.
If you don’t understand what it is about, well then i am referring this point of Zend Framework Documentation.  Ok this article explains how easy and simple it is to use a ZF Tool to create Zend Projects automatically from command console.
The First Basic step is to download the Zend Framework Package itself. You can Download the Package from here.
After Downloading, Extract the folder and note the path of it. In my case i have extracted at  C:\Zend so i will be using this all over my instruction. (Note in this example i am taking Xampp for Windows as example).
The next part is including the Zend Library in php.ini file. You can find the php.ini file in C:\xampp\php\php.ini.  Open it with the code editor and find this line which is usually at line no 794.
include_path = “.;C:\xampp\php\PEAR”
Now include the path where you have extracted the Zend Framework, so the above line changes like below
include_path = “.;C:\xampp\php\PEAR\;C:\xampp\php\ZendFramework-1.11.7\library”
and Close the php.ini file.
You have successfully included the Zend library with php. The next step is to create an environment path for php as well as Zend Framework.  Try to find three files inside the \bin directory of zend framework package you just extracted. The bin folder contains a zf.php, zf.sh, and zf.bat.
According to Zend Documentation, these files are client wrappers which are responsible for finding the proper php.exe, finding the zf.php, and passing on the client request. The zf.php is the responsible for handling and understanding your environment, constructing the proper include_path, and passing what is provided on the command line to the proper library component for dispatching. Since we are in Windows environment we shall be playing with zf.bat file.
The next part is to help zf.bat script to locate the directory of Zend Library. By creating an environment variable called ZEND_TOOL_INCLUDE_PATH, the ZF tool can identify the location of Zend Library. If you have no idea how to create an environment variable in Windows, then please check this MS Knowledge Base.
Create either a System or User Environment Variable with the following
Variable Name:Â ZEND_TOOL_INCLUDE_PATH
Variable Value: C:\xampp\htdocs\ZF\library
Additionally you can also create a PATH Environment variable for PHP Complier and Zf.bat File. To do so create a system or user variable called PATH.
Variable Name: PATH
Variable Value: C:\Zend\bin;C:\xampp\php
If you can find a variable called PATH already then you can append values by using a semicolon like above.
Finally Restart your System for changes to take effect. Now test if you have correctly configured the Environment variable by opening a command window (Start->Run, Type Cmd).
In the cmd window, type php -v to check the php version or zf show version to check the Zend Framework Version.
The next step is to Create a Zend Project. Navigate to the htdocs folder in Command Console or cmd and type the following command.
zf create project <projecttitle>
Thats it, you can start using the basic zend project by accessing http://localhost/<projecttitle>. With this predefined configuration, you can start creating modules, controllers and add actions in it.
Learn the basic structure and try to modify the code. That’s it. Happy Programming! If you have any queries feel free to drop your comments. I would try to assist in possible time.


Leave a Reply