Category: Tutorials

  • Configuring Amazon SES with Mantis Bug Tracker for Email Notifications

    So you deployed one of best bug tracker system in your ec2 instance and was wondering how to configure its email setting with SES ? After Amazon Introduced SMTP accounts, things that were so complicated become so easier.  Every application that supports SMTP connection method made it possible and compatible to be used with Amazon SES.

    But things are not simple with Mantis Bug Tracker Configuration because the basic configuration file does not contain the necessary attributes needed for configuring Amazon SES SMTP email or Google SMTP Accounts. They are just enough for an ordinary SMTP settings.  So after doing some research over a couple of forums and user tryouts, the following configuration listed below works

    # — Email Configuration —
    $g_phpMailer_method = PHPMAILER_METHOD_SMTP;  #For SMTP Method
    $g_smtp_host = ’email-smtp.us-east-1.amazonaws.com’; #Your SES SMTP Host
    $g_smtp_connection_mode = ‘tls’; #It is mandatory for SES and Gmail SMTP
    $g_smtp_port = 587; #For some Reason only this port was working in SES
    $g_smtp_username = ‘SMTP Username’; # Your SES SMTP Username
    $g_smtp_password = ‘SMTP Password’; # Your SES SMTP Password
    $g_administrator_email = ’[email protected]’; #Email displayed at footer (Must be an approved sender list in SES)
    $g_webmaster_email = ’[email protected]’; #Verified SES Sender Email
    $g_from_email = ’[email protected]’; # From Address (Verified SES Sender Email)
    $g_return_path_email = ’[email protected]’; # the return address for bounced mail
    $g_from_name = ‘From Name’;
    $g_enable_email_notification = ON;

    The above configuration will do the trick and you can start receiving emails from Mantis Bug Tracker 🙂 Fire up the comments section if you had any doubts in it !!!

  • Increase phpMyAdmin upload / import size

    By default you get a 2mb limit of upload / import size in phpmyadmin. That makes it odd and highly impossible to import larger files. You can increase the allowed upload size of phpmyadmin by editing your server’s php.ini configuration file. Usually in servers like CentOs it is located at /etc/php.ini.

    Step 1: Go to php.ini and find the following and change their values to something more higher than your database size. (In this example i have used 20mb).

    upload_max_filesize = 20M

    post_max_size = 20M

    Step2 : Restart your apache service for this new change to take effect. Usually the command to restart apache would be

    service httpd restart (CentOs) / service apache2 restart (ubuntu)

    You can also restart directly from their path like

    /etc/init.d/apache2 restart or /etc/init.d/httpd restart

    If you are in a shared hosting and do not have root access or access to your php.ini configuration file, then the other way is to create a .htaccess file in your application root and add the following line

    php_value upload_max_filesize 10M
    php_value post_max_size 10M

    If you were still not able to increase it, please send me an email for more detailed assistance.


  • How to Unsubscribe from FutureBazaar.com Daily Sms Alerts

    How to Unsubscribe from FutureBazaar.com Daily Sms Alerts

    Disclaimer

    Update (30th May 2018): Dear readers, please remember this post was posted 7 years before, so I won’t be responsible or liable for any SMS charges or if this option no longer works. Please try it at your own discretion and risk.

    If you are one of those frustrated customers of FutureBazaar.com like me who get Daily Deals SMS Alerts and wanted to turn it off ? Then you have come to the right place. For some reason the Account settings in FutureBazaar.com under the My Subscriptions tab won’t work. You can see two options, one to subscribe the Email Alerts and the other for Mobile Alerts. Unfortunately only the email alerts will be turned off and you still keep getting those annoyed sms from them.

    The only solution to turn of Daily Sms Alerts is to Send the following message from your registered cell number.

    “DEALS NO” to 575758

    You will be charged Rs.3 for sending the above SMS. To turn the Alerts Again in the future, you have to send “DEALS YES”.

  • Resolving DNS Issues with Airtel Broadband

    Resolving DNS Issues with Airtel Broadband

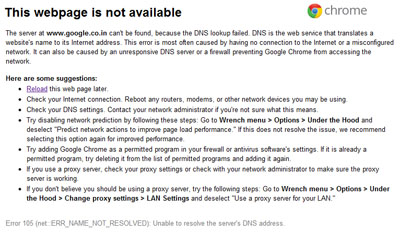
    If you are an Airtel broadband user and face DNS Error Redirection or DNS Resolving Error like the one below then most probably your network adapter is configured to automatically obtain DNS server from your service provider. The Modem acts as a DNS Server and sometimes in most circumstance the DNS Error Redirection of your ISP may cause some problem and you end-up with the screen below. I too had this problem for a very long time and tried even other third party DNS Service like Open DNS and Google Public DNS but still i face those issues. After using the ISP’s own DNS Server address in my network adapter i could resolve the issue and browse without any flaws.

    By default the problem should be resolved using any third party DNS Server but unfortunately the thing doesn’t work for me and force me to use their own DNS Server. At home i use OPEN DNS which works like a charm. Anyways try to change your DNS Server using these steps with the DNS Address of Airtel Below:

    Airtel Broadband

     Preferred DNS Server: 202.56.215.28

    Alternative DNS Server: 202.56.215.29

    Hope this resolves the DNS Issue with Airtel. If you are still not able to resolve it, then the next step would be to ring up the Customer Care @ 121 from your Airtel Landline. Alternatively if you would like to try third party DNS Service like Open DNS and Google DNS, then use the ip address below

    Open DNS

    Preferred DNS Address :  208.67.222.222

    Secondary DNS Address: 208.67.220.220

    Google Public DNS

    Preferred DNS Address : 8.8.8.8

    Secondary DNS Address: 8.8.4.4

    If you live in India then i would suggest using Open DNS which have faster results than Google Public DNS.


  • Creating a basic Zend project using CLI Tool in Windows

    Creating a basic Zend project using CLI Tool in Windows

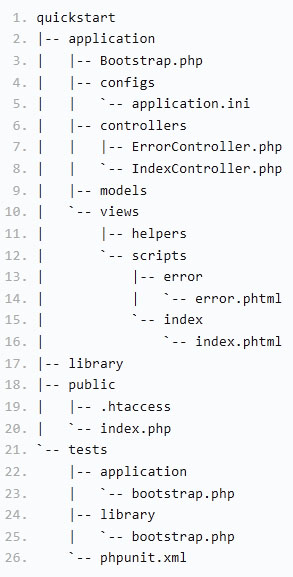
    Zend Framework is an object oriented web application framework that uses the MVC (Model-View-Controller) Architecture.  I have been using Zend Framework  for the past one year to build php based web applications. Out of this period i found many freshers who wanted to start with Zend Framework, struck at the first point of creating  tree structured directories for Zend Framework project and their configuration files. Although the Zend Documentation provides step by step instruction for creating your own basic project, it failed to give a detailed instruction for Windows Users to create a directory structure automatically using the CLI Tool for Windows.

    If you don’t understand what it is about, well then i am referring this point of Zend Framework Documentation.  Ok this article explains how easy and simple it is to use a ZF Tool to create Zend Projects automatically from command console.

    The First Basic step is to download the Zend Framework Package itself. You can Download the Package from here.

    After Downloading, Extract the folder and note the path of it. In my case i have extracted at  C:\Zend so i will be using this all over my instruction. (Note in this example i am taking Xampp for Windows as example).

    The next part is including the Zend Library in php.ini file. You can find the php.ini file in C:\xampp\php\php.ini.  Open it with the code editor and find this line which is usually at line no 794.

    include_path = “.;C:\xampp\php\PEAR”

    Now include the path where you have extracted the Zend Framework, so the above line changes like below

    include_path = “.;C:\xampp\php\PEAR\;C:\xampp\php\ZendFramework-1.11.7\library”

    and Close the php.ini file.

    You have successfully included the Zend library with php. The next step is to create an environment path for php as well as Zend Framework.  Try to find three files inside the \bin directory of zend framework package you just extracted. The bin folder contains a zf.php, zf.sh, and zf.bat.

    According to Zend Documentation, these files are client wrappers which are responsible for finding the proper php.exe, finding the zf.php, and passing on the client request. The zf.php is the responsible for handling and understanding your environment, constructing the proper include_path, and passing what is provided on the command line to the proper library component for dispatching. Since we are in Windows environment we shall be playing with zf.bat file.

    The next part is to help zf.bat script to locate the directory of Zend Library. By creating an environment variable called ZEND_TOOL_INCLUDE_PATH, the ZF tool can identify the location of Zend Library. If you have no idea how to create an environment variable in Windows, then please check this MS Knowledge Base.

    Create either a System or User Environment Variable with the following

    Variable Name: ZEND_TOOL_INCLUDE_PATH

    Variable Value: C:\xampp\htdocs\ZF\library

    Additionally you can also create a PATH Environment variable for PHP Complier and Zf.bat File. To do so create a system or user variable called PATH.

    Variable Name: PATH

    Variable Value: C:\Zend\bin;C:\xampp\php

    If you can find a variable called PATH already then you can append values by using a semicolon like above.

    Finally Restart your System for changes to take effect. Now test if you have correctly configured the Environment variable by opening a command window (Start->Run, Type Cmd).

    In the cmd window, type php -v to check the php version or zf show version to check the Zend Framework Version.

    The next step is to Create a Zend Project. Navigate to the htdocs folder in Command Console or cmd and type the following command.

    zf create project <projecttitle>

    Thats it, you can start using the basic zend project by accessing http://localhost/<projecttitle>. With this predefined configuration, you can start creating modules, controllers and add actions in it.

    Learn the basic structure and try to modify the code. That’s it. Happy Programming! If you have any queries feel free to drop your comments. I would try to assist in possible time.

  • How to troubleshoot problems while installing Magento in localhost

    How to troubleshoot problems while installing Magento in localhost

    I have to agree that most of us face a lot of issues while installing the latest version of Magento 1.4.2.0 in localhost. The version was released on December 8, 2010. So I thought of writing an article that would sort out the basic issues one would  face during magento installation. I am not much familiar with magento and this is my first experience trying it.

    Invalid Base url ( Please enter a valid URL. Protocol is required (http://, https:// or ftp://):

    You will face this error usually when the base url entered is like http://localhost/…./, you can easily resolve this issue either by simply replacing localhost with “127.0.0.1” . So your url goes like this

    http://127.0.0.1/magento/

    or else you can force magento to accept your localhost as url by modifying the validation.js file which is present in the magento installation directory at js\prototype\validation.js (note I don’t recommend doing this for any live servers, just for development and testing purpose).

    go to line 500 where you will see something like this

    ['validate-url', 'Please enter a valid URL. Protocol is required (http://, https:// or ftp://)', function (v) {


    return Validation.get('IsEmpty').test(v) || /^(http|https|ftp):\/\/(([A-Z0-9][A-Z0-9_-]*)(\.[A-Z0-9][A-Z0-9_-]*)+)(:(\d+))?\/?/i.test(v)
    }],

    remove all the regular expressions present and simply return true. So the above code will be changed to something like this

    ['validate-url', 'Please enter a valid URL. http:// is required', function (v) {
    return true;
    }],

    and for extra care , I would advise you to

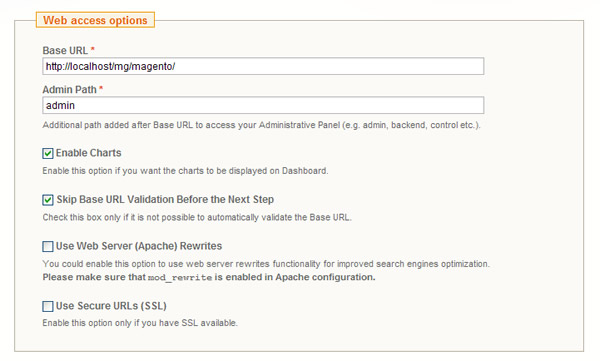
    Check the Skip Base URL Validation Before the Next Step option to prevent any validation of url. So the final selection would be like this
    Maximum Execution time exceed error.

    If you believe or not, Magento will create about 318 tables in your database. I was astonished becoz I used to work with very light content management systems like wordpress etc and this is the first time I am trying a powerful e-commerce site like Magento which has hell lot of tables.

    This is the reason why many of us end up with an error “Maximum Execution time exceed error.” The default maximum time execution limit for php which we have configured is not enough to posses such a powerful system.

    So if you are using a distribution system like xampp or lamp, you can simply find the php folder and configure the php.ini file

    Usually php.ini file can be found in c:\xampp\php\php.ini

    find two values which usually present at line 440 and 450. Change the default value to either 0 or 3600

    max_execution_time = 3600
    max_input_time = 3600.

    assigning value as zero (0) would give it infinite time for execution.

    These are the common issues one face during the installation of latest version of Magento 1.4.2.0.

    Unable to login after Magento installation in localhost:

    After the installation, I faced another problem. It wont allow you to login if you have used localhost as your base url instead of 127.0.0.1. This is because it wont accept cookies from localhost. You can resolve it by commenting out unwanted variables in session cookies in Varien.php. This file can be found in app/code/core/Mage/Core/Model/Session/Abstract/

    go to line 78 (varies based on versions) and you will find the array as shown below

    $cookieParams = array(
    'lifetime' => $cookie->getLifetime(),
    'path' => $cookie->getPath()
    'domain' => $cookie->getConfigDomain(),
    'secure' => $cookie->isSecure(),
    'httponly' => $cookie->getHttponly()
    );

    comment the last three lines see example below.

    $cookieParams = array(
    'lifetime' => $cookie->getLifetime(),
    'path' => $cookie->getPath()
    // 'domain' => $cookie->getConfigDomain(),
    // 'secure' => $cookie->isSecure(),
    // 'httponly' => $cookie->getHttponly()
    );

    Make sure you remove the comma after getPath(). Check screenshot

    If you come across any other issues do comment below to let me know.

  • Html5 Tutorials and Resources for Web Developers

    Html5 Tutorials and Resources for Web Developers

    Html5 the next version of HTML Standard offers many interactive features and flexibility to web developers by introducing new markups and API. There are several reasons why it is a good time to adopt HTML5 in your designs. The major would be that almost all the latest and upcoming version of browsers now provides the native support of HTML5 without depending any libraries. HTML5 is not a start from scratch, it is an upgrade from existing HTML4. So adopting HTML5 would be like upgrading your knowledge to meet the standards for Future Web Designs.

    I have gathered some of the best available tutorials to learn and adopt HTML5. Hope it helps you out.

    W3Schools

    W3schools is the best place to start and understand the basic html5 tutorials. It covers various sections and gives information about HTML5 new Tags, Elements, Video, Audio, Canvas, Forms and Events with Try out Examples. W3Schools also contains individual explanation of each tags with examples.

    HTML5Rocks

    A Site developed using HTML5 by Google is a HTML5 Playground. Provides an interactive HTML5 Sideshow which highlights and showcases the functionality of HTML5 as well as let you test it. Test center for experimenting each of the apis and provides step by step tutorials.

    1st Web Designer

    They have an interesting article which covers a huge list of HTML5 Tutorials starting from the beginners to advanced levels covering almost all the parts from layout creation to functionality.

    Webdesignledger

    They gathered a list of 15 essential and useful HTML5 Tutorials and Cheat sheets. Cheat sheets are very handy and useful. You can take a printout of it and stick over your desk for quick reference.

    NTT.CC

    Really nice collection of tutorials from various sites.  Also included CSS3 Tutorials and basic HTML functionality explained.

    Webappers.com

    The folks at Webappers have collected some must have CSS3 and HTML5 Tutorials aggregated from various other HTML5 and CSS3 Tutorials

    HTML5tutorial.net

    Best place to find many useful guides for HTML 5 resources including HTML 5 Tutorials, examples and references.

    Hope this tutorial would be a piece of use for enthusiastic developers.

  • Set My Computer as Default in Windows Explorer

    By Default the Windows Explorer in Windows 7 will open library folder instead of My Computer. In previous version of Windows, we have a My computer Icon that would actually pinpoint to all the higher levels of Drives in our Computer. If you are really annoyed with the default library folder of Windows 7 then there is a workaround for you which will actually change the default target of Windows Explorer to open My Computer.

    Follow the Steps below to apply the workaround:

    • Hold Shift and Right click the Windows Explorer Icon in Taskbar
    • Select properties in it and under the Target Field, replace the existing code with the following code below

    %SystemRoot%\explorer.exe /n,/e,::{20d04fe0-3aea-1069-a2d8-08002b30309d}

    or if you wanted to open a specific drive  you can use the following code

    %SystemRoot%\explorer.exe /e,d:\Documents

    Where d: is the drive letter and Documents is any of the folder u wanted.

    • Click Ok and Close the Task bar
    • To make this changes to All the occurances of Windows Explorer, Simply Open the Start menu
    • All Programs > Accessories and Right Click the Windows Explorer.
    • Then Invoke the properties and apply the same code above.

    Feel free to comment if you wanted any help over it.

  • Send Unlimited Free SMS to Anyone from Orkut now

    I am usually hypo active in all kinds of social networking sites nevertheless how good and helpful they are. But I loved Orkut since its launch and being an active user till now.  Orkut has many features to impress me like scrapping and limited customization etc but now it is used as a target to spread mass spam to users. The day since Orkut introduced html support in scraps and Orkut apps, spammers find their goals easy to achieve.

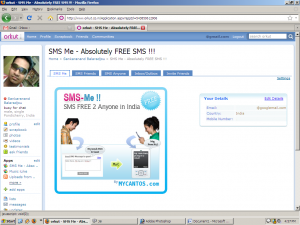
    Talking about Orkut apps, a newly introduced app called SMS Me came into my mind. This app is simply wow; it allows me to send unlimited scraps to any mobile number in India. What’s more could one want? Ok, I agree you! There are many such sites which give the same service but feeling the usability and complexity, I feel SMS Me just like using my own mobile. Upon adding this app, it has an interface in which you can recognize other SMS Me users with your friends’ database and display their profile with link to SMS them.

    SMS Me has 5 tabs that include the home, friends, anyone, Inbox and Invite friends.  Let’s have an overview about the features. If your friend is not using SMS Me, it prompts him via scrap to install that application.  SMS Anyone allows sending free sms to any mobile number in your country. I wanted to highlight the point unlimited stating that other services have some restrictions while this app can simply be used to bug someone easily.

    SMS Anyone section has two fields for Mobile number and the message to be sent.  Like an ordinary SMS, there’s a limitation of 118 characters per message.  Once u send a message from this app, your friend will receive a SMS from MyCantos masking their destination number with a signature for each message like “Sent by yourmobnumber from www.mycantos.com.

    Until now I have been talking about the advantage of this social app from the developer’s perceptive view now let me point out how this could influence Orkut and what disadvantages it has.

    • Encourage spammers to join Orkut
    • Now M-commerce can be spammed easily like never before.
    • No need of entering captca test for each SMS you send which gives privilege for a java script to send mass SMS easily.
    • No option to block specific users, so until you both get compromised you are never relieved.

    Final verdict: I love this app and hate it as well…lol.